Upgrading Your Bullet Train Application
Note: These upgrade steps have recently changed.
These instructions assume that you're doing a stepwise upgrade on an app that's already on version 1.4.0 or later.
The Stepwise Upgrade Method
This method will ensure that the version of the Bullet Train gems that your app uses will stay in sync
with the application framework provided by the starter repo. If you've ever upgraded a Rails app from
version to version this process should feel fairly similar.
We recommend gradually upgrading one version at a time. This makes it relatively easy to pinpoint any
specific changes that may cause problems with your app. Trying to jump a bunch of versions at once can
make it hard to figure out exactly where problems are coming from.
The basic idea is that if you're on 1.4.0 you should upgrade next to 1.4.1, run your tests, deploy
those changes and make sure things are working well. Then upgrade to 1.4.2 etc... If you update regularly
then each individual update should be relatively small.
For performing the upgrade you have two options:
- Use the GitHub Action we provide to create an upgrade Pull Request
- Performa a manual upgrade via git
GitHub Action
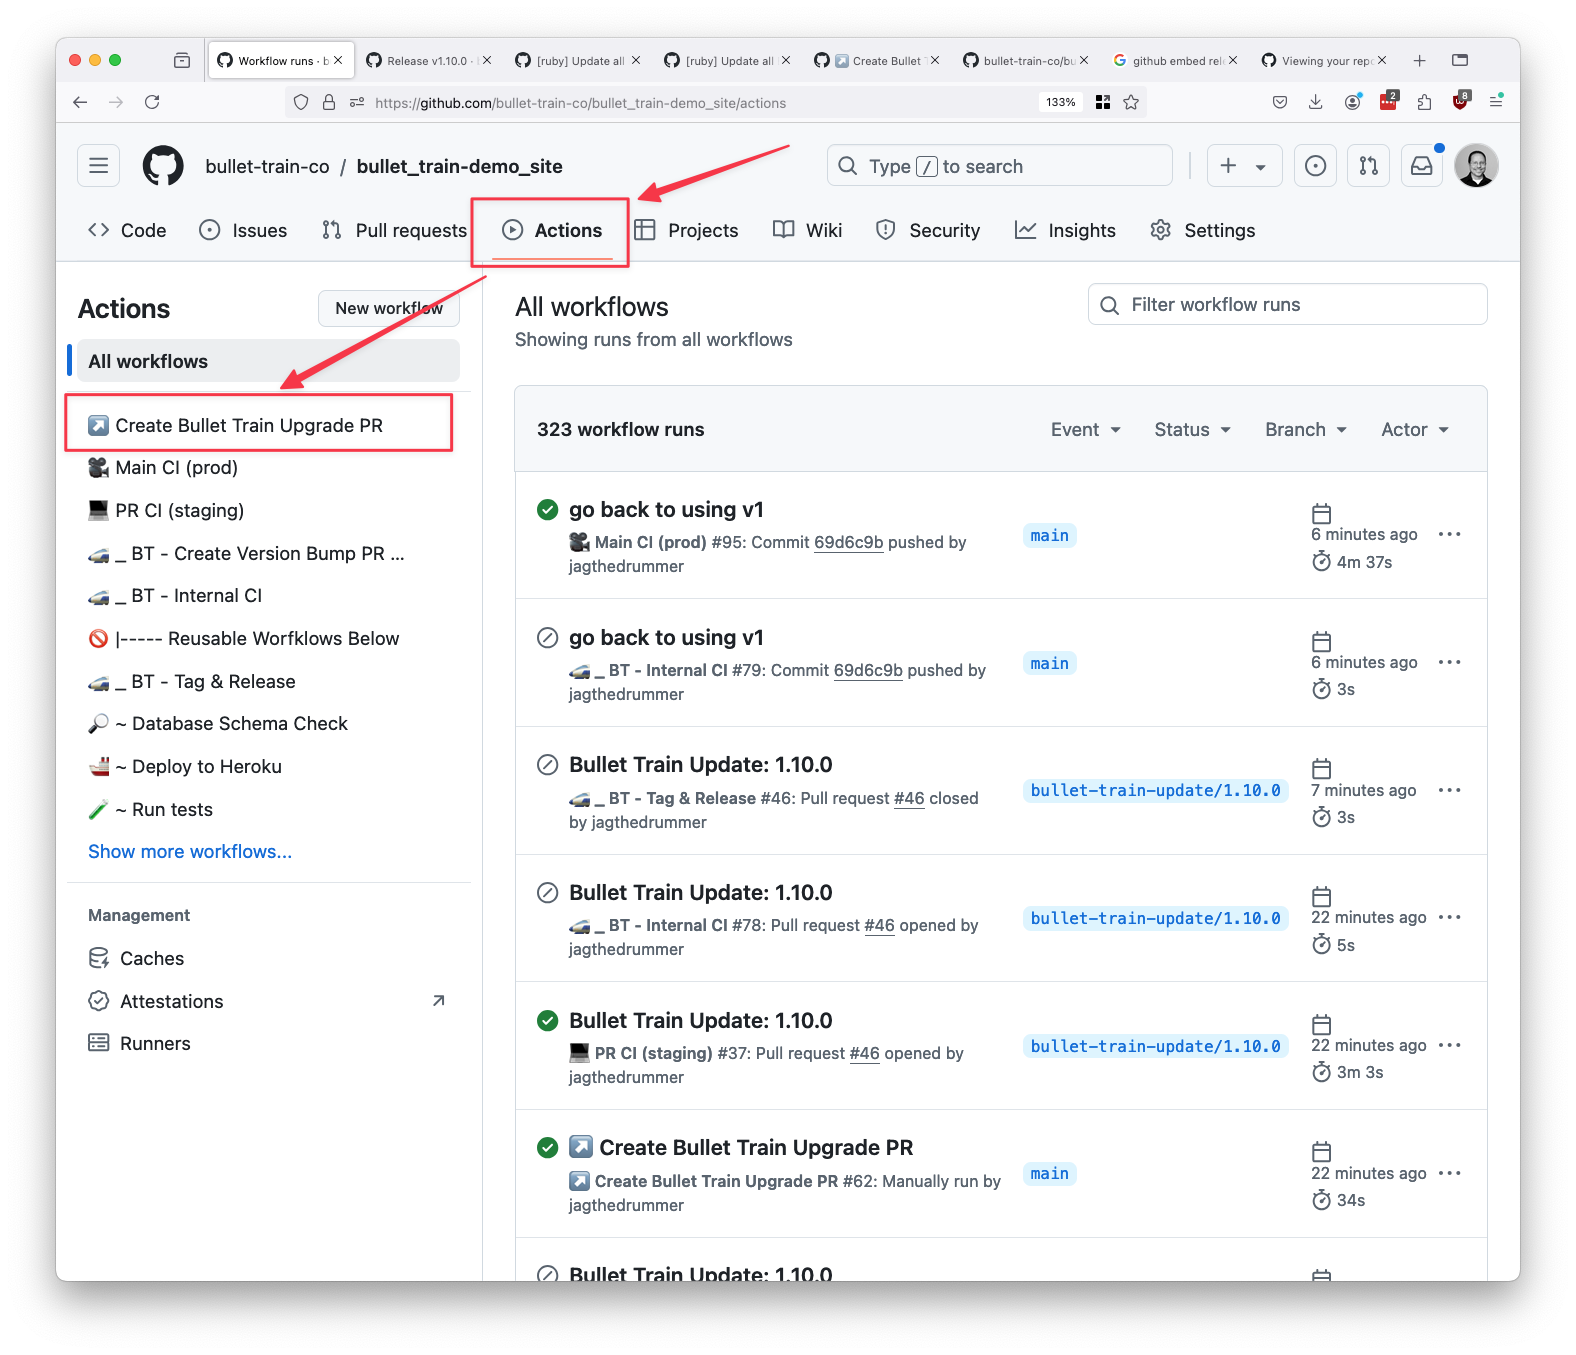
First go to the "Actions" tab on your project and then click on the "↗️ Create Bullet Train Upgrade PR" link on the left.

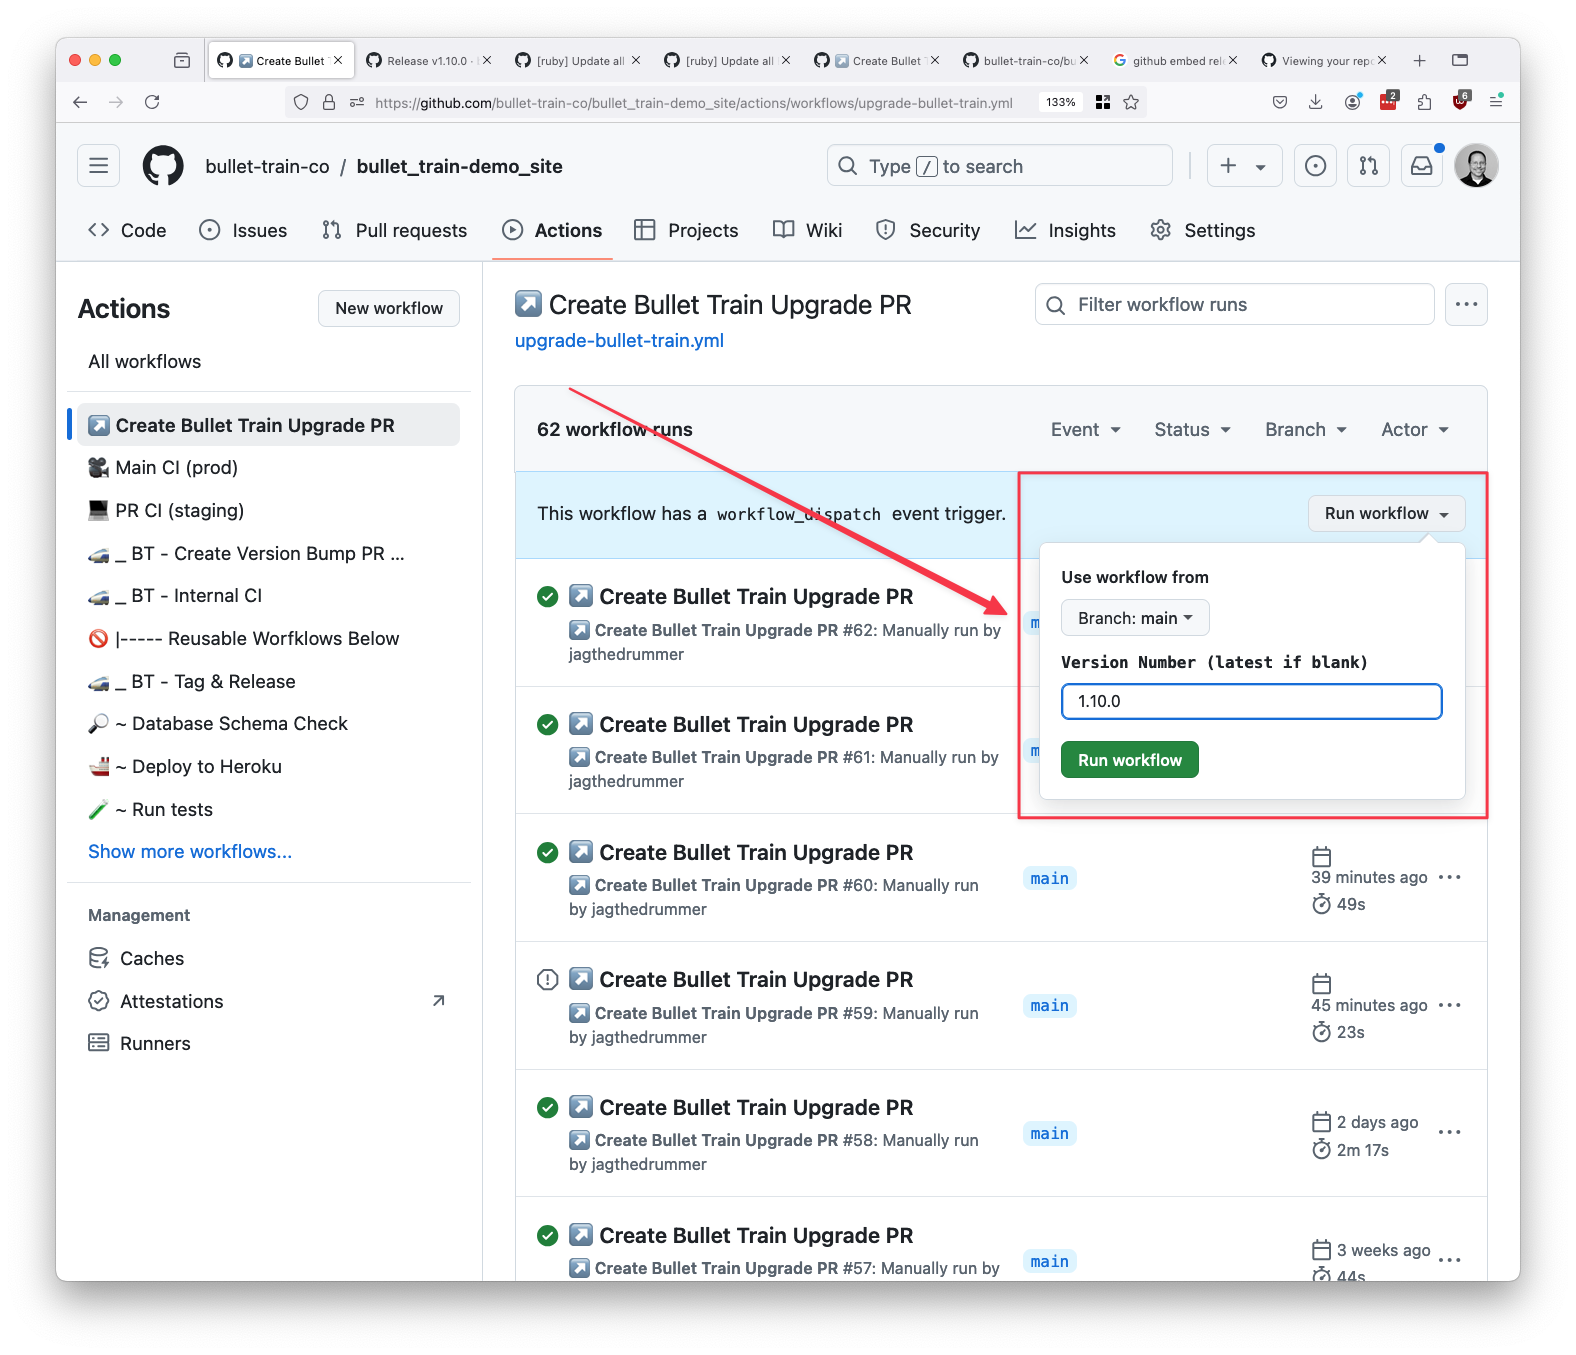
Then on the right side of the page click the "Run workflow" button and enter the target version. 1.4.1 for instance.
If you don't enter a version number then the action will target the latest version available on GitHub.

A few seconds after you click the green "Run workflow" button you should see a new action running.

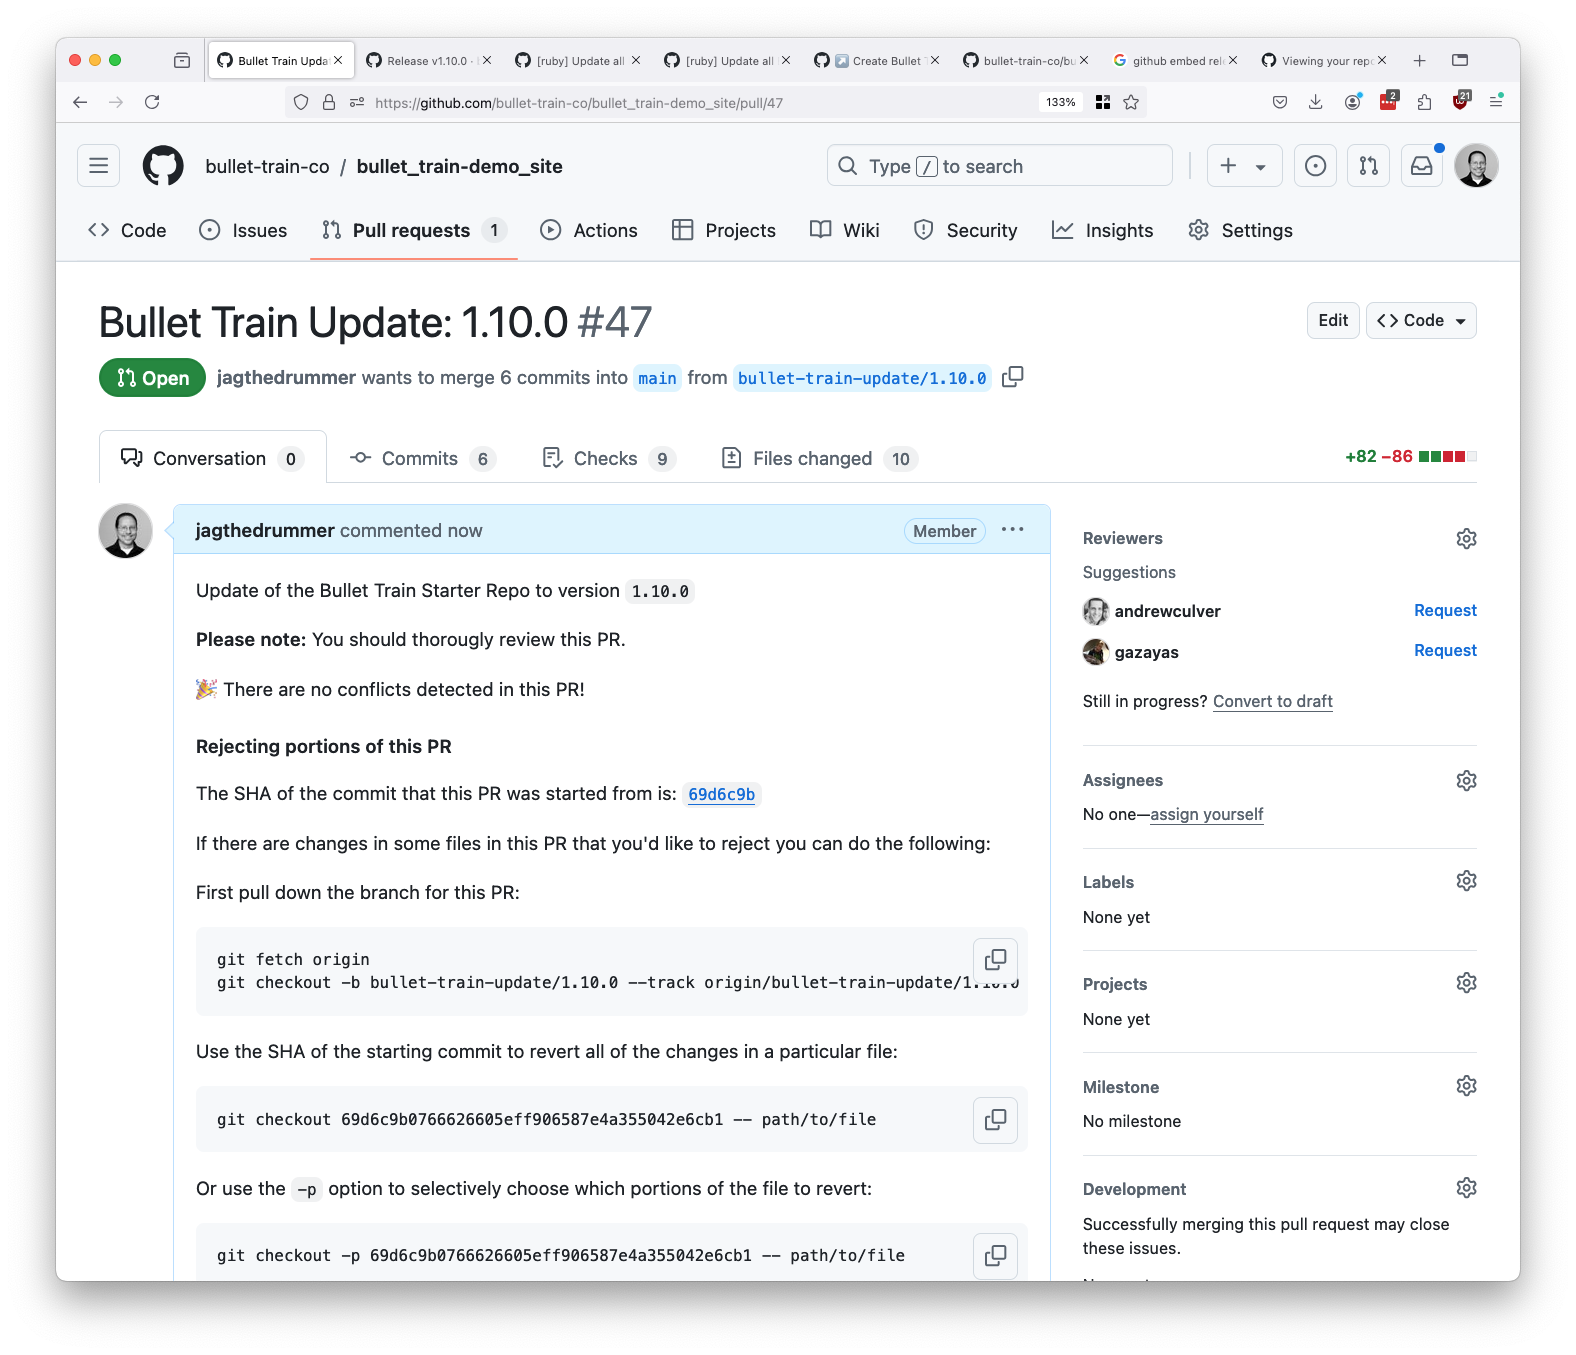
Once the action has completed you should have a new Pull Request that will perform the upgrade.

You should review the contents of the pull request, run the tests, and pull down the branch to run it locally.
The GitHub action is basically an automated version of the manual upgrade process described below.
Manual Upgrade
Pulling Updates from the Starter Repository
There are times when you'll want to update Bullet Train gems and pull updates from the starter repository into your local application.
Thankfully, git merge provides us with the perfect tool for just that. You can simply merge the upstream Bullet Train repository into
your local repository. If you haven’t tinkered with the starter repository defaults at all, then this should happen with no meaningful
conflicts at all. Simply run your automated tests (including the comprehensive integration tests Bullet Train ships with) to make sure
everything is still working as it was before.
If you have modified some starter repository defaults and we also happened to update that same logic upstream, then pulling the most
recent version of the starter repository should cause a merge conflict in Git. This is actually great, because Git will then give you the
opportunity to compare our upstream changes with your local customizations and allow you to resolve them in a way that makes sense for
your application.
⚠️ If you have ejected files or a new custom theme, there is a possibility that those ejected files need to be updated although no merge conflicts arose from git merge. You will need to compare your ejected views with the original views in bullet_train-core to ensure everything is working properly. Please refer to the documentation on indirection to find out more about ejected views.
1. Decide which version you want to upgrade to
For the purposes of these instructions we'll assume that you're on version 1.4.0 and are going to upgrade to version 1.4.1.
2. Make sure you're working with a clean local copy.
git status
If you've got uncommitted or untracked files, you can clean them up with the following.
# ⚠️ This will destroy any uncommitted or untracked changes and files you have locally.
git checkout .
git clean -d -f
3. Fetch the latest and greatest from the Bullet Train repository.
git fetch bullet-train
git fetch --tags bullet-train
4. Create a new "upgrade" branch off of your main branch.
It can be handy to include the version number that you're moving to in the branch name.
git checkout main
git checkout -b updating-bullet-train-1.4.1
5. Merge in the newest stuff from Bullet Train and resolve any merge conflicts.
Each version of the starter repo is tagged, so you can merge in the tag from the upstream repo.
git merge v1.4.1
It's quite possible you'll get some merge conflicts at this point. No big deal! Just go through and
resolve them like you would if you were integrating code from another developer on your team. We tend
to comment our code heavily, but if you have any questions about the code you're trying to understand,
let us know on Discord!
One of the files that's likely to have conflicts, and which can be the most frustrating to resolve is
Gemfile.lock. You can try to sort it out by hand, or you can checkout a clean copy and then let bundler
generate a new one that matches what you need:
git checkout HEAD -- Gemfile.lock
bundle install
If you choose to sort out Gemfile.lock by hand it's a good idea to run bundle install just to make
sure that your Gemfile.lock agrees with the new state of Gemfile.
Once you've resolved all the conflicts go ahead and commit the changes.
git diff
git add -A
git commit -m "Upgrading Bullet Train to v1.4.1."
6. Run Tests.
rails test
rails test:system
7. Merge into main and delete the branch.
git checkout main
git merge updating-bullet-train-1.4.1
git push origin main
git branch -d updating-bullet-train-1.4.1
Alternatively, if you're using GitHub, you can push the updating-bullet-train-1.4.1 branch up and create a
PR from it and let your CI integration do its thing and then merge in the PR and delete the branch there.
(That's what we typically do.)
